


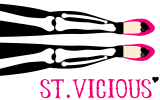
First, you'll need to make your button. This is my example :) It's really as simple as taking a picture and resizing it! You can add text, graphics, etc too if you want!
Generally, most sidebars for three column blogs are 220 pixels wide and under. It does vary, but you want your blog button to be around an average size so that people can put it onto their blog without it being too big. I like to make my buttons around 180 pixels wide and around 100 pixels high. This way it's big enough to be seen and read, but not so big that I take up a lot of room on other people's blogs.
Once you have your button made, it's time for image hosting. You'll need to have an account on a site like Flickr or Photobucket for example. (There are lots of image hosting sites, so find one that you like!) Sign-up and/or log-in and then follow the steps to upload your blog button image. (Most of these sites have help sections that will show you exactly what to do if you are unsure.)
Now it's time for the fun part ;) You know how blog buttons have that little code box underneath them so you can grab the link? Well this is what you need to get your button and that code box to show up on your blog.
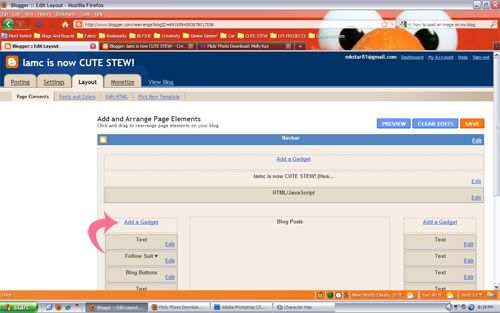
First, log-in on to your blog. (Obviously I am using blogger, so these steps will be based off of that.) Then got to your LAYOUT section. You are going to add a gadget to your sidebar. (If you have two sidebars, choose the one you want your button and code to be on.)
click on add a gadget
Then add an html/javascript gadget to your sidebar (click the plus sign)
<a href="http://lessapathymorecake.blogspot.com/" target="_blank"><img style="width: 180px; height: 89px;" alt="visit cute stew" src="http://i41.photobucket.com/albums/e256/mkstar826/blg2.png" border="0" /></a>
<textarea rows="2" cols="20" wrap="”VIRTUAL”"><a href="http://lessapathymorecake.blogspot.com" target="_blank"><img border="0" alt="visit cute stew" src="http://i41.photobucket.com/albums/e256/mkstar826/blg2.png " /></a><br /></textarea>
This is a code for one of MY blog buttons. Everything that is noted in RED needs to be changed. (Don't worry, I'm going to break it down :D) Start at the beginning and one by one, start replacing everything in RED with your info. An easy way to do this is copy your new text, highlight what you want to replace, and paste over it.
-instead of "http://lessapathymorecake.blogspot.com" fill that in with your blog's URL.
-instead of width: 180px and height: 89px fill that in with your button's actual dimensions.
-instead of "visit cute stew" put in your blog name.
-instead of "http://i41.photobucket.com/albums/e256/mkstar826/blg2.png" put your image's URL there.
You will do this throughout the entire code until all of MY original code is information is replaced with YOURS.
Now, you are going to save the gadget onto your side bar and voila! You should have a working button and code box. If it didn't work, back track and make sure you have everything changed. REMEMBER: DO NOT CHANGE ANYTHING IN BLACK...only RED! Be very careful or your code will not work!
If you find your button is too big for your sidebar, simply go to layout and edit your gadget. You can resize it by simply changing your width and height in the code. Play around with it until it's to your liking.
I *think* that's it! I hope you enjoyed this tutorial and if you use it and it works for you, link your new blog button so I can see :D If you want to make several blog buttons you use the SAME code...but you have to change the width and height (if necessary) & the image URL. So just copy and paste it again but swap those things out for your new image...
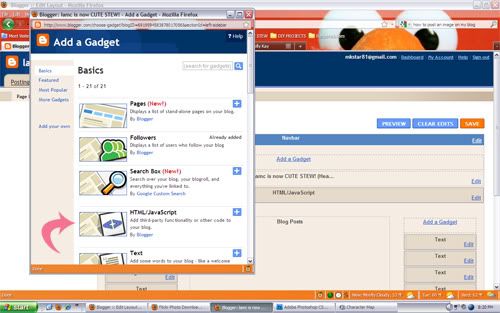
Another window will pop up (entitled configure html/javascript) and this is where you are going to put your code in. You will see a big blank box entitled content...copy and paste this code there:
<a href="http://lessapathymorecake.blogspot.com/" target="_blank"><img style="width: 180px; height: 89px;" alt="visit cute stew" src="http://i41.photobucket.com/albums/e256/mkstar826/blg2.png" border="0" /></a>
<textarea rows="2" cols="20" wrap="”VIRTUAL”"><a href="http://lessapathymorecake.blogspot.com" target="_blank"><img border="0" alt="visit cute stew" src="http://i41.photobucket.com/albums/e256/mkstar826/blg2.png " /></a><br /></textarea>
This is a code for one of MY blog buttons. Everything that is noted in RED needs to be changed. (Don't worry, I'm going to break it down :D) Start at the beginning and one by one, start replacing everything in RED with your info. An easy way to do this is copy your new text, highlight what you want to replace, and paste over it.
-instead of "http://lessapathymorecake.blogspot.com" fill that in with your blog's URL.
-instead of width: 180px and height: 89px fill that in with your button's actual dimensions.
-instead of "visit cute stew" put in your blog name.
-instead of "http://i41.photobucket.com/albums/e256/mkstar826/blg2.png" put your image's URL there.
You will do this throughout the entire code until all of MY original code is information is replaced with YOURS.
Now, you are going to save the gadget onto your side bar and voila! You should have a working button and code box. If it didn't work, back track and make sure you have everything changed. REMEMBER: DO NOT CHANGE ANYTHING IN BLACK...only RED! Be very careful or your code will not work!
If you find your button is too big for your sidebar, simply go to layout and edit your gadget. You can resize it by simply changing your width and height in the code. Play around with it until it's to your liking.
I *think* that's it! I hope you enjoyed this tutorial and if you use it and it works for you, link your new blog button so I can see :D If you want to make several blog buttons you use the SAME code...but you have to change the width and height (if necessary) & the image URL. So just copy and paste it again but swap those things out for your new image...
Happy button making!
MK
MK
p.s. As soon as the boy fixes our laptop and I get my precious Photoshop back, I'll be glad to make blog buttons for anyone who wants one! NO charge ($$$), handmade crafts and/or kawaii trades only! Let's barter it up people ;) Email me if you're interested!! My laptop situation should be handled in a week or so. We have to order a part, ugh...
 & this blog is under construction. excuse any weirdness you see!
blog design by the most awesome:
& this blog is under construction. excuse any weirdness you see!
blog design by the most awesome:


9 lovely readers said...:
uggh! I can never get this. there is always something missing!
I LOVE your blog! really love it!
amazing, thank you!!
Thank you so much, I'll think I'll try my hand at it later! Have a great day!
That's exactly what I do but I have NEVER had luck with using Flickr to host the images!
Have you done any like that? I'd rather use Flickr and delete my photobucket account. I don't use it for anything!
P.S. Yay for trades! That's exactly what I am doing on my blog too!
courtney -- I use only use photobucket for my blog buttons. I've never tried with Flickr sorry!
you're welcome girls!
you are seriousssssly awesome.
amazing!
thanks again love
<3
xoxox
ah i've been wondering how to do one of these with the text box @ the bottom to copy/paste the code. thanks!
Thank you so much for this, I so needed this help ♥
Thank you!!! I just used this for my blog & it looks great!
xoxo
MB
Post a Comment